Tuesday, April 10, 2012

Easter's Over...say goodbye to the bunny rabbits


Every spring we get bombarded with calls asking us, "how can I keep the rabbits from eating my flowers?"  It's no suprise to get these calls, and we can certainly understand how it can be so distressing for so many people. Nothing can more quickly turn a beautiful morning into sudden disaster than walking out into your garden and realizing that something has eaten every flower off of every single one of your new annuals.  It's both sad and frustrating.  And while none of these cure are full proof, they can help keep your plants from being completely devoured.


DeFence. The stuff will keep the rabbits, and deer too, at bay. They hate the smell and taste of the stuff. Once dried, you won’t smell it. Plus, it’s organic and natural and won't harm kids or pets.


Add garlic chives or garlic bulbs to your flower garden.  Mix them in with the flowers here and there, and you might get lucky.


Marigolds.  Try planting them.  They are not a favorite of rabbits, and if you have enough of them around, then they just might try to find another yard with better tasting flowers.


A dog.  Yes, most rabbits aren't fans of dogs.  If you have one, chances are he or she will help keep the rabbits away.


Prepare this mixture for spraying.  Take a handful of habenero peppers, a head of garlic, a handful of marigold leaves and place in blender.  Add enough water to liquefy.  Strain it into a sprayer and spray it directly on your flowers.  Scatter the straining remains on your beds.


Grate soap over your flower garden areas.  We've heard it works, but we're making no promises.


Cayenne pepper.  We've all tried this one.  Sometimes it works, other times it does not.

If you've found some sure-fire solutions, we'd love for you to share them in the comments section.


Monday, April 9, 2012

Drying Your Own Herbs


So, you've decided to plant a herb garden this year?  You already know how you'll use the fresh herbs, but what if you're garden's really producing and you just can't use all thos fresh herbs.  Maybe you should turn to drying your gardens.  Not only is drying your own herbs more economical, but it's also much more satisfying to use herbs you've grown and harvested from your own garden.

Here are a few tips to ensure you complete the process correctly and with the least amount of effort.


Harvest your herbs just before you plan to dry them. How can you tell when they're ready for picking?  They should be fully developed, but before blooming starts. Once you've picked your herbs, take the time to pluck off the damanged leaves and pieces of stem that appear dead.


Look over your herbs to ensure they are free of insects.  If you want to wash them, be sure and do that a couple of days BEFORE you pick them.  Spray them off with the hose, let them dry a couple of days and then pick them.


Get all your supplies ready before you pick.  Have everything you'll and the spot you'll be drying picked out.  A warm, dry, dark location is the best place to dry herbs.  A shed, a pantry, a dark garage.


In order for the herbs to dry at a similar rate, tie them together in similar size bunches.  Each bunch should consist of 7 to 10 stems.


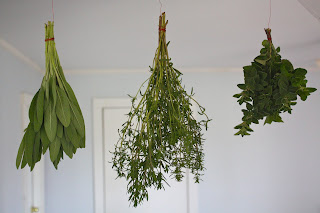
Tie the stems together and hang upside down.  For herbs with larger stems, you can dry alone and hang by a hook made of wire.


Hanging your herbs upside down by the stems will allow the oils to drain into the leaves, giving you the best flavor.


If you are drying your herbs in an area where dust or wind can damage your leaves, you may want to place a paper bag over your herbd.  Just tie the top of the bag shut with twine, and add a couple of slits in the back to allow ventilation. 


If all your conditions are prime, then it will take approximately five to six days for your herbs to dry.  If it's under 75 degrees, it can take up to two weeks for your herbs to dry.  85 degrees is optimal!


It is okay to dry different types of herbs at the same time, but don't put two different herbs too close together, and definitely don't let them touch.


When the leaves are almost papery in feel and texture, the drying is complete.  Be careful not to overdry.  If the leaves crumble to the touch, they have dried for too long, and you need to make another effort.


To store your herbs, remove the leaves from the stems.  Gently place them on a surface that will allow you to easily transer them to an airtight container.  Glass is best, and dark glass is even better.


Never store your herbs in the sunlight. 


Do not crush your herbs until just before you plan to use them. 


Friday, April 6, 2012

Using the Unusual


Who doesn't like to be a little different every now and then?  I love beautiful pottery for container gardens, but it's also fun to try something out of the ordinary when deciding on a container for your next plant display. 


Take a walk around your house and look around to see what's lurking and might provide a home for some of your favorite plants this season. Vist antique stores, look through your garage or in your attic. If you let your mind wander a little, you will probably come up with some unique ideas of your own.  To inspire you, we'll post some ideas we've discovered.


An old basket makes a simple container for growing herbs. 


How about an old baby bathtub?

Or a vintage clawfoot tub?


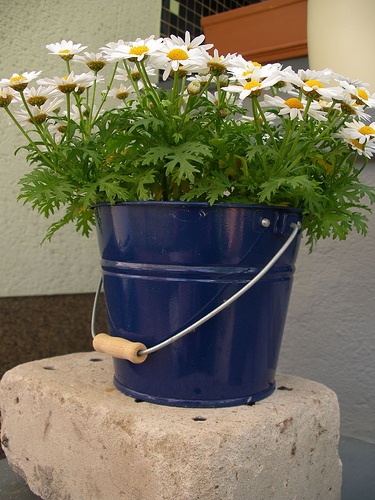
A bright buket is perfect for a container of daisies.


An unsued fountain or birdath is fabulous for adding height to your landscape.


Did you ever think an old bed could be put to such great use?


Or an old bicycle?


Old chairs used as plant stands are another way to add interest.  Paint one a bright color, and you've got instant cheer.


A favorite is an old colander.  Stunning, isn't it?


And if you're lucky enough to find one of these old newstands?  Well, how cute is that idea?


An old mailbox?  Of course!


An old red wagon is the perfect size and it's also easy to move around.  If it's a Radio Flyer, then a double bonus!


An favorite pitcher, filled with flowering plants is sure to perk up your outdoor table.


Or grab a serving bowl you rarely use, and give it new purpose.


Watering cans are not just for watering plants.


Yep, those are rubber boots.


Nothings says reuse and recycle like an old trash can. 


Feeling inspired?  Take a look around and let us know your ideas in our comments section.  We can't wait to hear what you've come up with.


Thursday, April 5, 2012

Bringing Sound to Your Landscape


Nothing can soothe the soul more than the sound of lightly splashing water.  Of course, who wouldn't want a gorgeous water feature as part of their backyard retreat?  But sometimes space and dollars come into play. With a little resourcefulness, ingenuity and time, anyone can make a small fountain for their deck, patio or sitting area by following a few simple instructions.  We've decided to share some simple instructions that can easily be altered with your own ideas, and you can also find more tutorials and instructions on the web.

Things you will need to get started:


  • 3 flowerpots of decreasing sizes
  • Water fountain pump
  • Waterproof sealant or adhesive
  • Acrylic Sealant for coating pots
  • Plastic tube or hose
  • Tube, preferably made from plastic
  • Plastic flowerpot stands or small bricks


  • First:

    Clean all your pots thoroughly and let them dry.
    For the base of the fountain, use a pot with no hole, or fill the hole completely with the sealant or adhesive. Apply a coat or 2 of acrylic sealant to make it water resistant. Set the pot aside for a few hours  to let it dry completely.

    Second:

    Place the fountain pump in the bottom of the largest pot, taking care to ensure the opening is not obstructed.  Attach a plastic tube to the top of the pump.  Cut it off at a height that is just shorter that that of all three flowerpots combined.  Next run your fountain cord up and out near the back of the largest pot. 

    Third:

    Now you're ready to add the second pot.  Place one of the stands or a brick into the bottom of the first pot.  Next, put the second pot on the stand.  Make sure your stands are small enough that the base of the second pot is at least one inch below the rim of the largest (base) pot.  Pull the tube throgh the hole of the second pot.  Seal off the area around the tube with the waterproof sealant.

    Fourth:

    Repeat the previous step.  Make sure the brim of the third pot is the smallest so water runs down it into the second pot and then into the largest pot.  Slide the tube through and remember to seal the extra area around it.  You can add a tip or sprayer to this tube to give your fountain the desired flow.

    Five:

    Once the sealant has completely dried, fill the largest (base) pot with water.  Turn the fountain pump on.  The pump will push the water from the base pot, into the second pot.  Fill the base pot again so the water pups into the third pot and water starts running down the side.  Once the flow is working, fill the pots with small pebbles, stone or glass rock.  You will probably have to remove some of the water once you do this. 

    Six:

    Enjoy the sounds!

    Tuesday, April 3, 2012

    Stamped Concrete vs. Pavers


    Stamped concrete is a continuous concrete surface that has been "stamped" to look very similar to individual pavers, bricks and stone. There are several reasons to consider stamped concrete over pavers for a patio, walkway, driveway or pool deck. 


    Many homeowners are deciding on stamped concrete over pavers because of the spaces that are left between pavers.  These spaces allow weeds to grow between the individual pavers;  something that will not happen with stamped concrete. 


    Aesthetically, stamped concrete is able to give the look that many people identify with individual pavers.  With a multitude of stamp patterns and color choices, a homeowner can select a very natural look for their surface.  There are stamps that can be used to look like slate, granite, cobblestone and even wood surfaces.  With all the choices available and because of the ease of maintenance, stamped concrete has become a new favorite with homeowners.


    Monday, April 2, 2012

    A Virginia Favorite...Geraniums


    Geraniums have been gracing the steps of Virginia homes for ages, and it's not a surprise considering their impact.  Geraniums are one of the most reliable plants for adding color and will produce new flowers from spring until frost. For best flowering production, be sure and place your geraniums in a sunny spot.  Be sure and fertilize your geraniums with a liquid fertilizer during the growing season, and pinch back those spent blooms.

    We thought we'd share a few of our favorites.

    Ivy Leaf Geranium.


    Apple Scented Geranium.


    Regal Elegance Geranium.


    Summer Showers Ivy Geranium.